
Summary:
– Role of the lubrication system
– Elements of the lubrication circuit
– Functions of the oil filter
– Equipment needed to change an oil filter
– Step 1: Drain the motor oil and remove the oil filter
– Step 2: Prepare to install the new oil filter
– Step 3: Install the new oil filter and check for leaks
Changing a car’s engine and oil filter is an operation that is within everyone’s reach. However, like most interventions on a car, it is essential to be rigorous and follow the basic rules, otherwise there can be serious consequences, including engine breakage. This post provides you 3 tips to change an oil filter.
Role of the lubrication system
The lubrication circuit, which includes the oil filter, ensures:
– the pressure lubrication of all elements subject to high pressure (crankshaft bearings, connecting rod bearings, camshaft bearings, etc.);
– and spray lubrication of all rotating engine parts.
Good to know: the lubrication circuit therefore has a dual lubricating role, but it also acts as a cooling vector by collecting the calories as close as possible to the combustion chambers and pistons.
Elements of the lubrication circuit
It consists of the following elements:
– an oil pump which ensures an operating pressure (from 3 to 7 bar). It incorporates a relief valve which regulates the pressure;
– piping to convey pressurised oil to the engine components;
– a return circuit, by gravity, to the lower crankcase;
– an oil pressure indicator. It lights up when the pressure is too low;
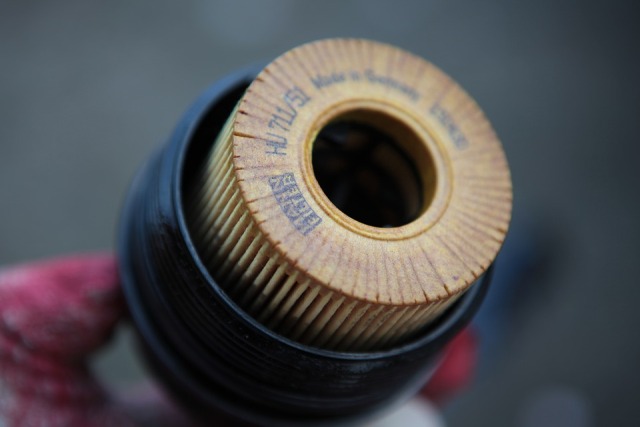
– an oil filter served under pressure. This is available in two forms:
– a filter element, removable, which is placed in a metal or plastic bell;
– a screw-in filter, with a filter element inseparable from its metal casing. The assembly is screwed onto the engine block.
Functions of the oil filter
The enemy of the engine is the presence of particles, which can be devastating. They cause:
– premature wear and loss of compression in the air supply system;
– seizure of the injection pump or injectors in the fuel system;
– loss of oil pressure and engine breakage in the oil circuit.
Good to know: the oil filter consists of a stack of sheets of porous paper, whose filtration threshold blocks impurities larger than 10 microns (0.010 mm).
In the lubrication circuit, the oil filter has a triple function:
– particle filtration;
– cooling of the oil circuit (especially for spin-on filters);
– safety element in case of obstruction. If the filter becomes clogged, a built-in by-pass valve opens by
– short-circuiting the passage through the oil filter, thus preserving the lubrication circuit despite the absence of filtration.
The filter must, therefore, be changed regularly, at the same time as the engine oil.
Important: if today’s manufacturers’ recommendations go up to 40,000 km, it is preferable, for the sake of your engine, to change the oil every 15,000 to 20,000 km. You don’t want to take any risk!
Equipment needed to change an oil filter:
– Cartons
– Chiffon
– Chain wrench
– Filter wrench
– Torque wrench
– Container
– Phillips screwdriver
Step 1: Drain the motor oil and remove the oil filter
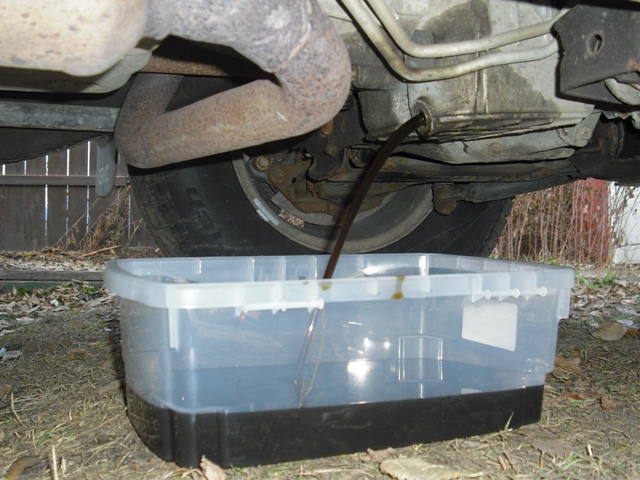
Start by draining the engine oil into a suitable container.
Then remove the oil filter according to the type of filter.
Case 1: Remove the oil filter in the form of a metal screw-in cartridge
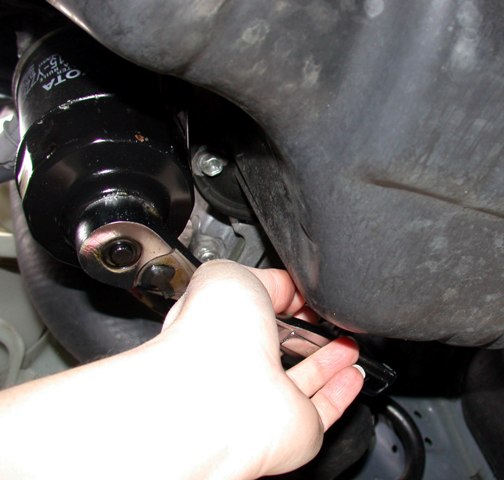
The oil filter is loosened using a strap wrench.
Good to know: in some cases, it is possible to loosen the filter by hand.
Place a protective cardboard box under the car and place a container to collect the oil that drains from the filter. Also, put a cloth under the filter to protect the engine from drains.
– Tighten the strap on the filter body.
– Rotate counterclockwise (left rotation) to loosen the filter.
– If the filter gets stuck, replace the strap wrench with a wrench with slots (specific to the type and brand of filter) or a chain wrench, which is more universal.
Good to know: if the filter is stuck, the ultimate solution is to drill the filter through with a large screwdriver, which will be used to force the filter loose.
Case 2: Remove the oil filter under the bell housing
– Unscrew the bell cover using a suitable wrench (often a hexagon socket 22 to 27).
Important: as the cover is often made of plastic, it is important to use a suitable wrench to prevent it from breaking.
– Remove the filter element by pulling it out vigorously.
– As soon as it is extracted, place the filter in a plastic bag to prevent draining.
Step 2: Prepare to install the new oil filter
– Check that the new filter is compatible with your vehicle model.
– Compare with the old model: both filters must have the same dimensional characteristics (including the same threads).
Case 1: Prepare the screwed metal cartridge
– Check that the used gasket has not remained in place on the engine block.
Important: this error is quite common among beginners, it prevents the system from being watertight and almost irremediably involves a major leak and breakage of the running engine.
Case 2: Prepare a cartridge under the bell
– Install the 2 gaskets supplied with the filter under the bell:
◦ a small diameter gasket on the filter element;
◦ another gasket, of large diameter, on the cap of the bell.
– Lubricate the gaskets.
Step 3: Install the new oil filter and check for leaks

Case 1: Place the screw-in cartridge
– Screw the cartridge to the engine block.
– Follow the specified tightening torque. The screwed-in cartridge is generally tightened by hand: when the cartridge comes into contact with the block, tighten it an 8/10th turn (IE. 290°).
Good to know: the average torque is 20 to 30 N.m.
Case 2: Place the filter under a bell
– Insert the filter element.
– Screw on the bell cover following the tightening torque recommended by the manufacturer.
Check the tightness of the installation
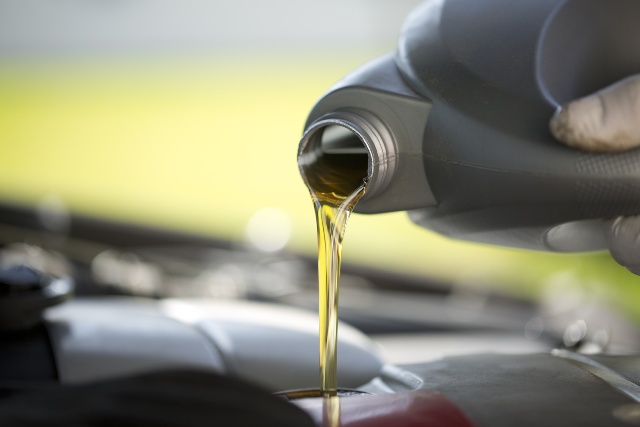
– Replace the drain plug and pour in the recommended amount of new oil.
– Run the engine (start without accelerating).
– Check for oil leaks.
– Do not forget to dispose of the impregnated oil filter, the oil, the oil seal and all other soiled items (rags, cardboard, etc.) at the waste disposal site.
Good to know: many professional auto garage accept to collect oil and filters.
While you were explained the above steps in the easiest way possible, draining the motor oil and changing the oil filter is not a piece of cake for many drivers or DIY enthusiast.
Note: you can call Fix it Transmissions in Cheltenham. They are backed by more than 18 years of experience and they will take care of your car as if it was their own.

3 thoughts on “3 Easy Steps to Change an Oil Filter”