

Summary
– How a starter works
– Step 1: Identify symptoms of starter failure
– Step 2: Check the battery
– Step 3: Check the solenoid power supply
– Step 4: Check the main power supply to the starter motor.
– Step 5: Remove the starter and validate your diagnosis
Replacing a starter is often an operation made difficult by its inaccessibility in the engine. It is, therefore, essential to carry out a preliminary test to validate its malfunction.
What is a starter?
The starter is an auxiliary electric motor whose role is to drive the engine to start it.
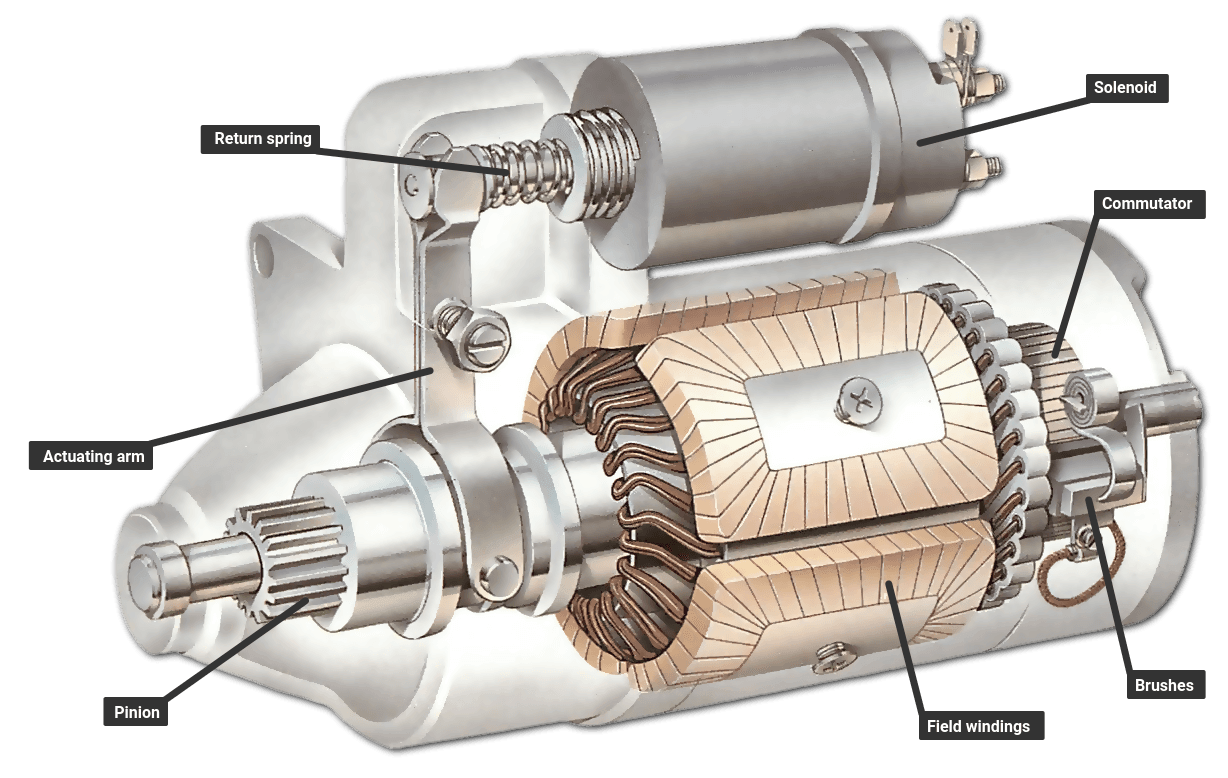
The starter can be divided into 3 functional groups:
- The main electric motor is the central and imposing part of the device; it drives the car’s combustion engine. To ensure the rotation of the motor at a minimum speed of 800 rpm, it is oversized and a significant energy consumer: it absorbs an electrical current of 300 to 600 amps for a light vehicle;
- The solenoid is a specific integrated relay that allows the starter’s remote activation by the key switch.
- The mechanical system consists of a fork attached to the solenoid, which activates a freewheel on the starter shaft, attached to a pinion.
How does the starter work?
When the driver operates the car’s key switch in the start position, it sends an electrical voltage to the starter. This voltage, via the solenoid, establishes the electric motor’s main power supply through a large cross-section cable (16 to 35 mm2 ) connected to the battery.
As the starter starts to rotate, the solenoid moves the fork in parallel, causing the freewheel and its pinion to move—the pinion meshes with the flywheel‘s teeth attached to the crankshaft and drives the combustion engine.
Read more on What Are the Symptoms of a Bad Starter.
1. Identify symptoms of starter failure
A malfunction that could be a starter fault may have the following symptoms:
– The engine speed at start-up is insufficient.
– The battery is insufficiently charged or defective.
– The electric motor of the starter is damaged, or its contact brushes are worn.
– The starter only makes a snap sound.
– The starter is faulty; its solenoid is defective.
– There is no engine rotation and no audible noise.
– Solenoid power supply is deficient (check the key switch and power wire).
– If the battery indicator light goes out, the cause may be the starter, the battery, or the starter power cables (the + battery terminal cable, not to mention the ground cable connected to the body and the engine-gearbox assembly).
2. Check the battery
Before going any further, checking the battery is the first operation to be performed. Using a multimeter connected to its terminals, read its voltage, which should not be less than 13 volts.
Read more on Testing a Battery.
Otherwise, charge or replace it.
Read more on:
3. Check the solenoid power supply
Connect an indicator light between the power lead to the solenoid and a previously tested ground (motor body or battery ground terminal).
– Press the ignition key :
◦ If the lamp remains off, the starter is not the cause of the failure. Check the power fuse, key switch, and power line (there are often intermediate connectors on this line that may be involved).
◦ If the lamp comes on, the starter, or its main power supply, is the cause.
4. Check the main power supply to the starter
Check the battery terminals’ condition and, if they are sulphated (presence of a white deposit), clean them with water, and scrape their surface with a metal blade or a specific cleaning tool.
– Check the tightness and condition of the connection of the positive cable to the solenoid.
– Check the ground line: in automobiles, the current return is through the vehicle structure (hence the term “ground”). The powertrain assembly, a source of parasitic vibrations, is connected to the car’s chassis by silent blocks that electrically isolate it.
This means that ground braids or cables connect the engine to the battery and the bodywork. Therefore, it is vital to ensure that these lines are in good condition to ensure that the starter works properly. If these checks are acceptable, consider removing the starter.
5. Remove the starter and validate your diagnosis
Before replacing or disassembling the starter, test it once removed (secure it by putting its nose in a vice):
– Connect jumper cables between the battery and the starter (+ to solenoid connection and – to starter ground).
– Supply power to the + on the solenoid control through a jumper wire connected to the battery.
Usually, you should see the same malfunctions as mentioned above.
Warning: Do not venture to exchange a starter by yourself if you are not sure to validate its malfunction because a mistake can also blow your fuses. Instead, call a professional mechanic.

One thought on “How to Test a Car Starter”